
Whether you're replacing all your kitchen cabinets or are looking for a way to upgrade your kitchen's look without breaking the bank, cabinet molding can do wonders for your kitchen's appearance. Cabinet molding is an elegant feature that can improve the look of your cabinets and your kitchen as a whole. In the past, crown molding was seen as a sign of wealth, and the higher it was stacked signified how wealthy the homeowner was.
While cabinet molding is still considered a high-end decorative element, you don't necessarily have to be well-off to have it in your kitchen. Find out how to install crown molding and how to improve the look of your kitchen cabinets.

WHY YOU SHOULD HAVE CABINET MOLDING
Adding molding to your kitchen cabinets is a simple way to upgrade the look of your kitchen. While cabinets can certainly stand alone, cabinet molding helps complete the look of your kitchen. Whether you're completely renovating your space or are looking for easy ways to update your kitchen, cabinet molding is an elegant option. Adding cabinet molding can even increase the value of your home.
Molding can come in traditional or Shaker-style designs. There are many types of cabinet molding and trim pieces that can improve your kitchen's design. This allows you to add molding that matches your cabinet doors as well as your own personal style. Although there are several types of cabinet molding available, here are a few varieties commonly found in kitchen remodeling projects:
LIGHT RAIL MOLDING
Light rail molding is used at the base of cabinets to help conceal lighting fixtures and reduce glare from under your kitchen cabinets. Light rail molding can also be added purely for decoration, as there are many style options. When choosing light rail molding, ensure that the molding matches your cabinet doors and any other types of molding in your kitchen to create a cohesive look. When installing light rail molding, it's also important to consider whether you'll have kitchen appliances underneath the cabinets, so you can accommodate space for them.
SCRIBE MOLDING
Scribe molding is a thin piece of trim that finishes any gaps between your cabinets and the wall. This is an easy and affordable way to solve any visible inconsistencies once your installation is complete. It's common for the walls and ceilings to be inconsistent or out-of-square if you're remodeling a kitchen in an older home. Scribe molding is a bit flexible, enabling the trim pieces to fit tightly against surfaces that may be slightly curved.
BASE MOLDING
Base molding gives base cabinets a decorative trim along the floor. Countertop islands and peninsulas often have base molding because they stick out into your kitchen instead of being against a wall. Base molding helps these sections of cabinetry appear more like furniture so they fit in seamlessly.
EDGE MOLDING
Edge molding can be added around the outside edge of almost any part of your cabinets or shelves. Decorative edge molding creates a distinctive feature on your cabinets and adds character to your kitchen.
SKIN PANELS
Skin panels are applied to the sides of cabinets to create a consistent look. For example, if you're painting your cabinets and the grain on one cabinet panel prevents the paint from applying smoothly, you may consider adding skin panel trim. This will give your cabinet a smooth finish and unify your kitchen.
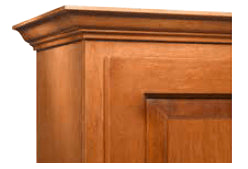
CROWN MOLDING
Crown moldingis applied to the top of your cabinets, creating a decorative customized look. This is an easy kitchen remodeling project you can install yourself and is very inexpensive. Crown moldings made of solid wood come in hundreds of profiles and can be stained or painted to match your existing cabinet doors. Crown molding is one of the most common types of molding, as there are many styles to match any cabinet doors.

TYPES OF CROWN MOLDING
Crown molding is a popular choice among homeowners looking for ways to upgrade the look and feel of their kitchens. Consider these types of crown molding when remodeling your kitchen:
-
Traditional crown molding: The traditional style of crown molding is the most common in homes. Traditional crown molding works best in classic-style kitchens and can make many other home styles look more high-end.
-
Stacked crown: Stacked crown molding consists of multiple pieces of molding stacked on top of each other. This helps create more height and is commonly used in rooms with higher ceilings. Stacked crown molding helps minimize the space between the top of a cabinet and the ceiling while adding a decorative element to your kitchen.
-
Stepped crown: Also known as staggered molding, stepped crown molding offers a way to accentuate your cabinetry. It's similar to the stacked crown style and adds volume to your cabinets. The difference with this type of crown molding is that the height can vary from cabinet to cabinet. For example, you may install taller stacks of molding on high cabinets and shorter stacks on lower cabinets to achieve the stepped design.
-
Interior crown: As with many of the other types of crown molding, interior crown helps to fill the gap between the top of your cabinets and the ceiling. Interior crown molding incorporates the crown molding on your ceiling to create a continuous look between your cabinets and the ceiling. This type of crown molding is installed around the entire perimeter of the kitchen's ceiling.
The type of crown molding you choose for your kitchen will depend on your personal style, the style of your kitchen and the style of your cabinets. For the most part, it's up to personal preference.

HOW TO INSTALL CROWN MOLDING
Installing crown molding is certainly easier with some craftsmanship knowledge, although this is not necessarily required. With the right tools, installing crown molding is relatively simple. For the best results, have these materials and tools:
- Miter saw
- Wood glue
- Nail gun
- Hammer and nails
- Backing wood strips
- Caulk or drywall hole patch
- Crown molding
A miter saw will be extremely helpful for this project because it can help you cut precise, clean lines. However, a coping saw is a good alternative for beginners. A nail gun will also make the job easier and eliminates the risk of denting the molding with a hammer.
Follow the steps below to complete your kitchen cabinet molding project.
1. CREATE A BASE
Creating a base out of filler wood gives you a place to nail the molding instead of nailing it directly into your cabinets. Your base will go on top of the cabinets, and the molding will end up covering it. This step is necessary if there is no room above the cabinet door to attach the molding. If your cabinets have a lot of space above the tops of the cabinet doors, you can attach the molding directly to the cabinet.
To create the base for your molding, cut your pieces of filler wood to the length of the top edge of your cabinets with 45-degree angles at the ends so the corners come together smoothly. Once you have the filler wood cut, use the wood glue to attach the base pieces to the tops of your cabinets.
2. CUT AND MOUNT SIDE MOLDING
Choose a side to start with, and measure and cut a piece of molding so it is a few inches longer than the side of the cabinet. Hold your cut piece up to the cabinet to mark where you'll make a 45-degree angled cut for the corner. Because this will be an outward angle, you should position the molding so the top edge is against the saw fencing and the bottom edge is against the table. Once the molding is securely in this position, cut where you marked the angle.
Now, line up the bottom of the molding with the top of the cabinet. Using the nail gun, nail the molding into the base wood.
3. CUT AND MOUNT FRONT MOLDING
The process above is similar to what you'll need to do for the molding on the front of your cabinet. However, for the front piece of molding, you'll want to cut your piece at least 7 inches longer than the length of your cabinet. This gives you plenty of molding to make angled cuts and trim down. Using the miter saw, cut one end to match the angled corner of the molding you already attached. With a partner's help, mark where you'll need to cut the other angle to meet the corner on the other side.
Once your front piece of molding is cut, attach it to the filler wood backing. Be sure to put a nail through both trim pieces when they meet at a corner. This helps create a solid connection and reduces any gaps between pieces.
4. SECURE THE LAST EDGE
For the final piece of molding, you'll want to cut the piece a bit longer than the edge of the cabinet. Doing so allows you to cut small pieces off the angled end of your piece until it fits snugly. Finally, you'll nail it into the backing like the other pieces.
5. TOUCH-UPS
The final step is to give your molding the finishing touches. You'll likely see gaps where pieces meet and nail holes. Use the caulk or drywall hole patching to cover the holes and fill in the gaps. Next, you can either paint or stain the molding to match your cabinets.
MAKING STOCK CABINETRY LOOK CUSTOM
Custom cabinetry is beautiful and ensures you're getting products that match the style and design of your kitchen renovation. However, completely replacing your cabinets with new ones may be out of your remodeling budget.Luckily, there are cost-effective ways to customize the cabinets you already have in your home. Consider the following tips for customizing stock cabinetry:
-
Add molding:Installing any additional molding enhances the look of your cabinets and your kitchen as a whole. Crown molding gives your cabinets a customized appearance and can add height and elegance to them. Consider simpler profiles or lighter colors for a more modern look.
-
Choose a different style:Cabinets come in various styles, offering you nearly endless options for remodeling your cabinetry. Creating a custom look for your cabinets can be as easy as replacing the cabinet doors or drawers with pieces of a different style. Refacing your cabinets is far more cost-effective than completely replacing them.
-
Paint or stain your cabinets:Painting or staining your current cabinets is one of the most cost-effective ways to achieve a custom look. With so many shades and colors available, you can achieve any design or style you want with this customization tip. Lighter colors can offer a more contemporary feel, while browns and reds often appear rustic and nostalgic.
-
Put cabinets on top of cabinets:Stock cabinets are typically installed with extra room between the tops of the cabinets and the ceiling. Use this space to your advantage. Installing small cabinets on top of your original cabinets can fill the extra space and create a custom look. A project like this can also add to the value of your home.
-
Take the doors off:Removing the doors of your top cabinets creates a custom open-shelving look. This can be a great way to show off your beautiful glassware or simply make your cabinets stand out. To further customize this cabinet option, hang colorful contact paper in the back of the cabinets for added color or design.
-
Add glass panels:Replacing the wooden panels on your cabinet doors with glass panels is another way to create your own custom cabinets. This cost-effective remodeling tip allows homeowners to have an open shelf look while still keeping the doors.
You can create your own custom cabinets in several different ways. Putting in the time to customize your cabinets is well worth it. You may even combine two or more of these customization tips to create truly unique custom cabinets. The beauty of doing projects like this yourself is that no one will have cabinets like those you create.

SHOP CABINET DOORS 'N' MORE
Kitchen cabinet moldings provide personal detail and a finishing touch for kitchen cabinetry and create a custom and polished look. For new, replacement cabinet doors, drawer fronts, drawer boxes and all of your cabinet remodeling needs, turn to the leader in the online kitchen cabinetry industry – Cabinet Doors ‘N’ More. You can order as little as one cabinet door front for a quick repair or a multitude of cabinet components for a large-scale project.
Whatever you need, we have the custom, high-quality replacement cabinet components you can count on for your DIY project. Browse our expansive collection, and contact our team for more information or with any questions so we can fulfill your cabinetry needs.
LEARN MORE ABOUT CABINET ACCESSORIES & HARDWARE

Shammy Peterson
May 09, 2023
My favorite part of your blog is when you said that you can complete and upgrade the look of your kitchen by adding molding. With this in mind, I will consider shopping for flexible crown molding later this month. One of my goals is to modernize the look of my kitchen next quarter of the year, so your tips are helpful. https://creativecrown.com/product/georgian-flexible-crown-molding/